How to Create a Poll in WordPress (Free, Step by Step)
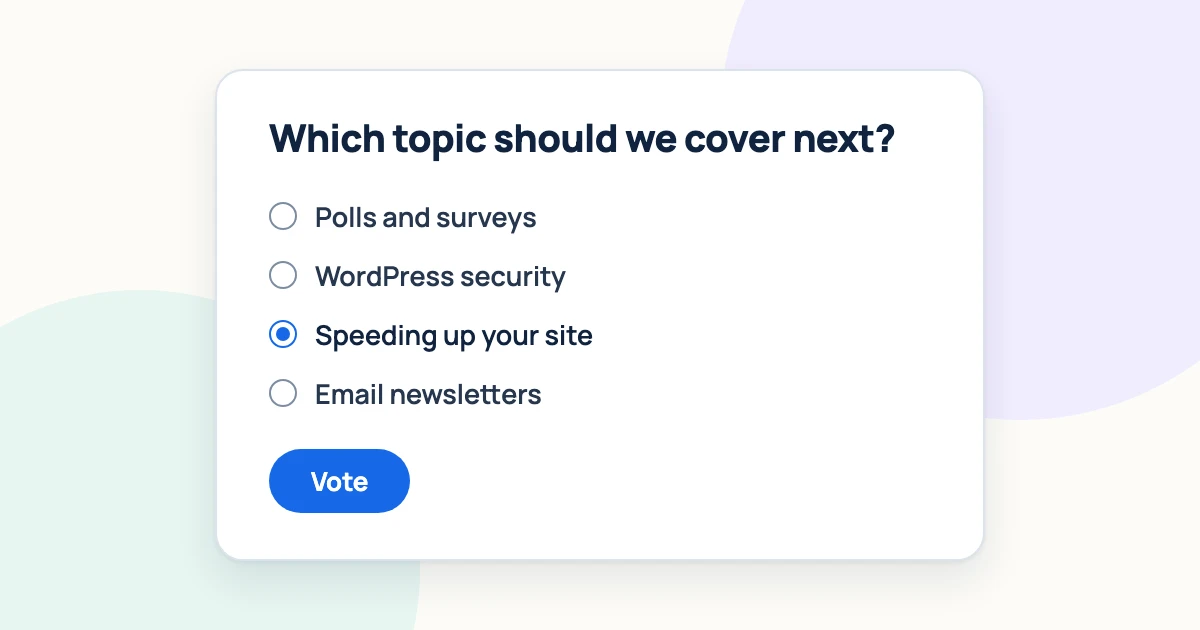
You can add a poll to any WordPress post or page with the free YOP Poll plugin. This guide walks through creating a poll from start to finish: you’ll write the question, make it look like your site, decide who can vote and when they see the results, place the poll on a post or page, and check that the votes come in. The poll in the image at the top is the one you’ll build.
Key Takeaways
- The free YOP Poll plugin covers a complete poll: question, answers, design, schedule, voting rules and results.
- Saving a poll doesn’t put it on your site. You still add it to a post or page with the YOP Poll block or a shortcode.
- By default anyone can vote more than once. Turn on Recognize returning voters if each person should vote only once.
- By default visitors see the results right after they vote. You can show them before voting, after the poll closes, from a date, or not at all.
What you need
- A WordPress site where you can install plugins (an administrator account).
- The free YOP Poll plugin from WordPress.org. Everything in this guide works in the free version.
- One clear question and a short list of answers.
Step 1: Install and activate YOP Poll
- In your WordPress dashboard, go to Plugins → Add Plugin.
- Search for YOP Poll.
- Click Install Now, then Activate.
If you haven’t installed a plugin before, WordPress.org’s guide to managing plugins (opens in a new tab) covers the same screens.
A YOP Poll menu appears in the dashboard sidebar, with All Polls, Add New, Bans, Logs, Settings and Upgrade to Pro.
Step 2: Write your question and answers
Go to YOP Poll → Add New. The poll editor has three tabs, Build, Styles and Settings, and a Visitor preview on the right that updates as you work. You start on Build.
- Click Add poll title at the top and name the poll, for example Next topic poll. Visitors don’t see this name. You use it to find the poll later.
- The poll already holds one Text choice question. Click Edit next to it.
- Under QUESTION TEXT, replace Text Question with your question. We used Which topic should we cover next?
- Under Answers, replace Answer 1 and Answer 2 with your own answers. Click + Add answer for each extra answer, and the × next to an answer to remove it.
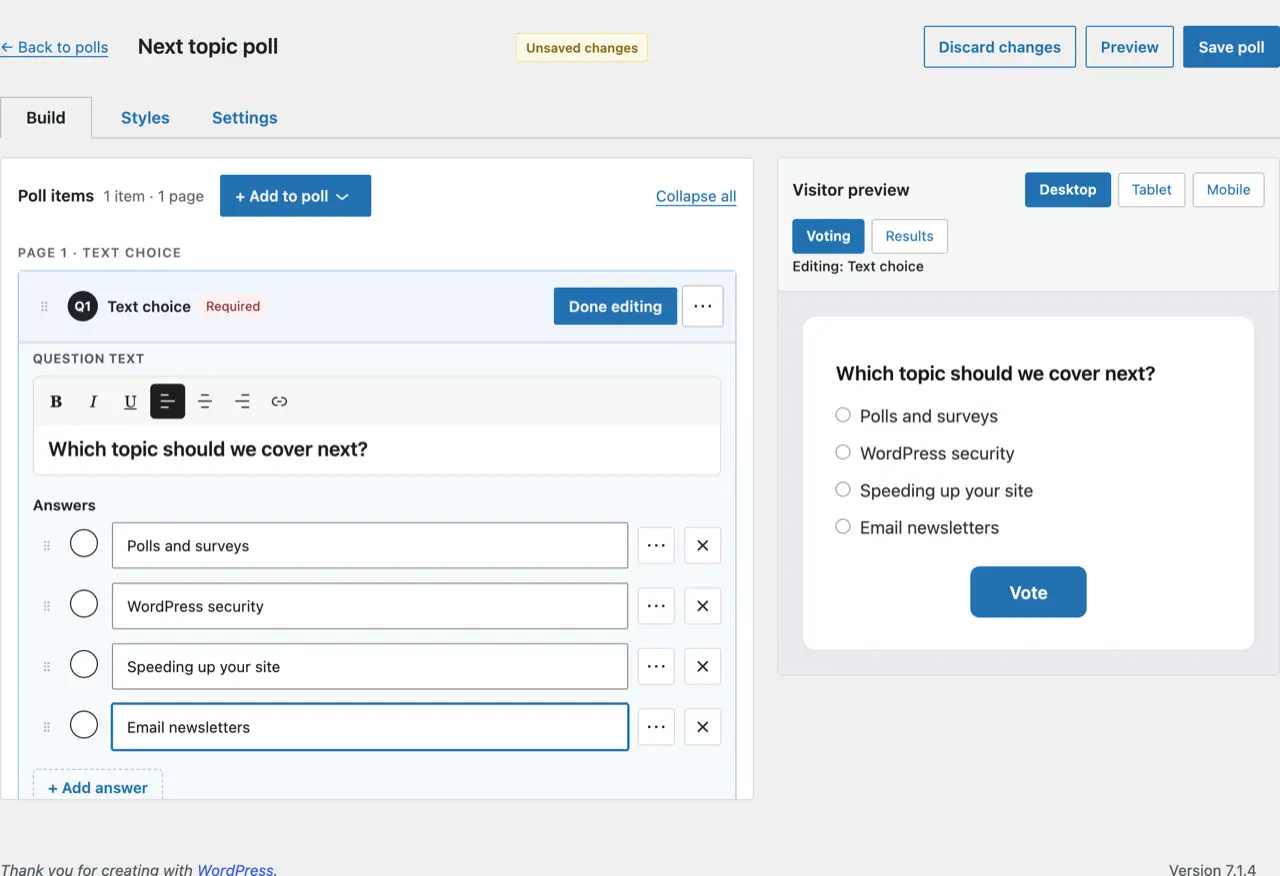
Question options
Still inside the question, under + Add answer, the Options panel controls how the question works. It’s open when you start editing. By default, visitors must answer the question and can pick only one answer.
- To let visitors pick more than one answer, tick Visitors can choose more than one answer. Two boxes appear under How many: At least (set to 1) and At most (set to the number of answers). Change At most to 3, for example, for a “pick up to three” question.
- To change how the answers are laid out, go to Arrangement and choose Vertical (one answer per line, the default), Horizontal (side by side) or In columns. With In columns, choose 2, 3 or 4 columns.
- To make the question optional, untick Visitors must answer this question.
- To let visitors type their own answer, tick Visitors can write their own answer. This adds an extra answer with a text box.
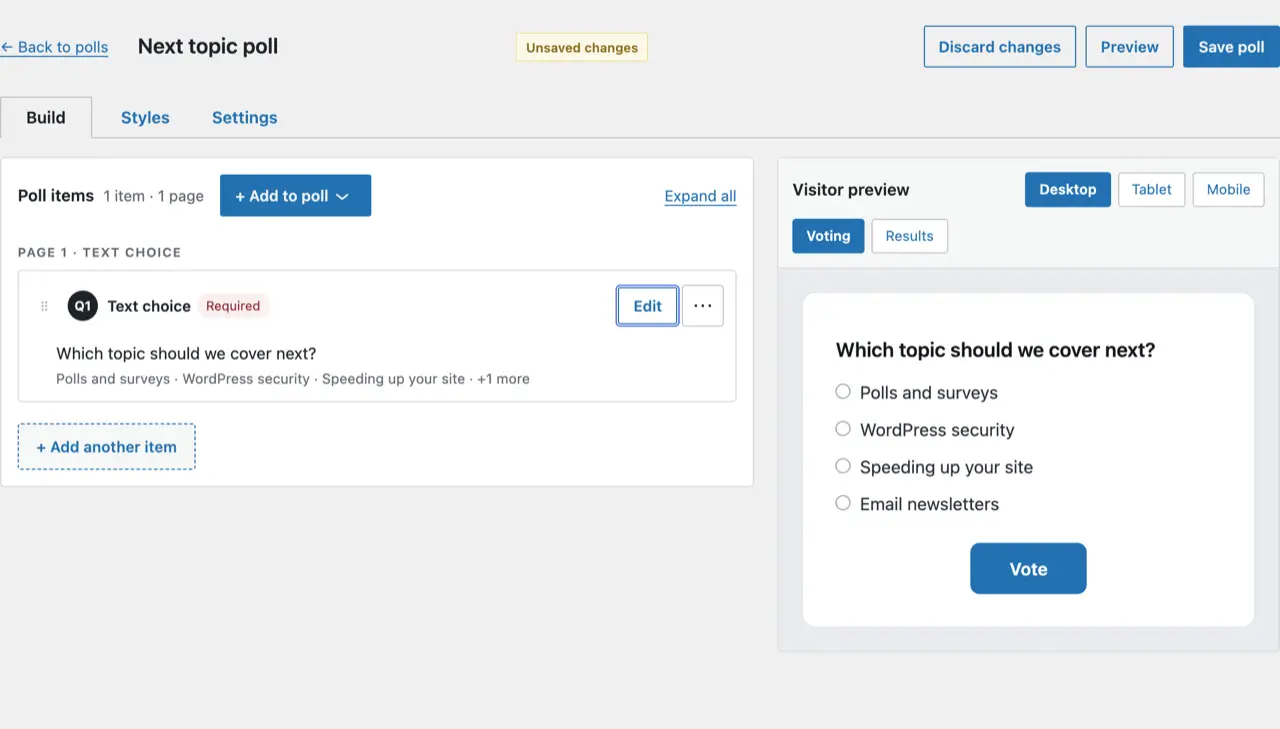
When the question is ready, click Done editing. The question folds up and shows its first answers. To change it later, click Edit again.
Step 3: Make the poll match your site
Open the Styles tab. This is where the poll gets the look of your site.
A new poll uses the Classic light style: neutral colors in a bordered card with a blue Vote button, which sits well on most themes. To change it:
- Pick a different starting style if you like: Modern tint, Soft rounded or Compact quiet.
- Under Accent, set Accent colour to your site’s main color.
- Fine-tune the rest section by section: Poll container, Questions, Answers, Choice markers, Buttons, Messages and Rules and spacing. The preview shows each change straight away.
To use the same look on your other polls, click Save as new style. A saved style can be applied to any poll on your site.
Step 4: Choose when the poll runs
Open the Settings tab. It has three sections on the left: Poll, Access and Results. Each one shows a short summary of its current choices, so you can check the whole setup at a glance. Poll opens first.
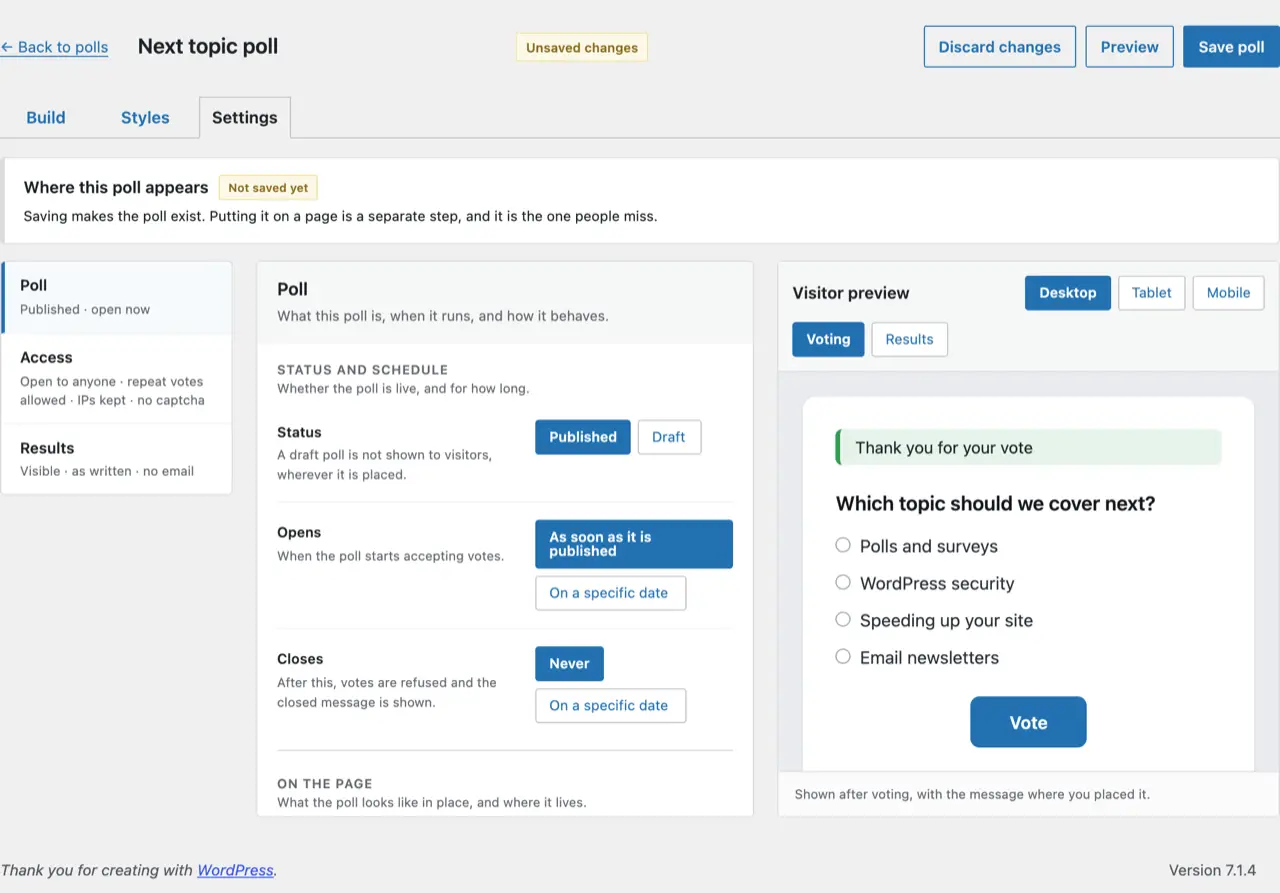
In Poll:
- Status: Published shows the poll to visitors. Draft hides it wherever it’s placed.
- Opens: As soon as it is published, or On a specific date.
- Closes: Never, or On a specific date. After that date, votes are refused and visitors see This poll is no longer accepting votes.
Further down, under On the page, you can change the Vote button text, and choose Where messages appear: Above the poll (the default) or Below the poll. This applies to every message the poll shows, such as the thank-you after voting.
Step 5: Decide who can vote
Open Access.
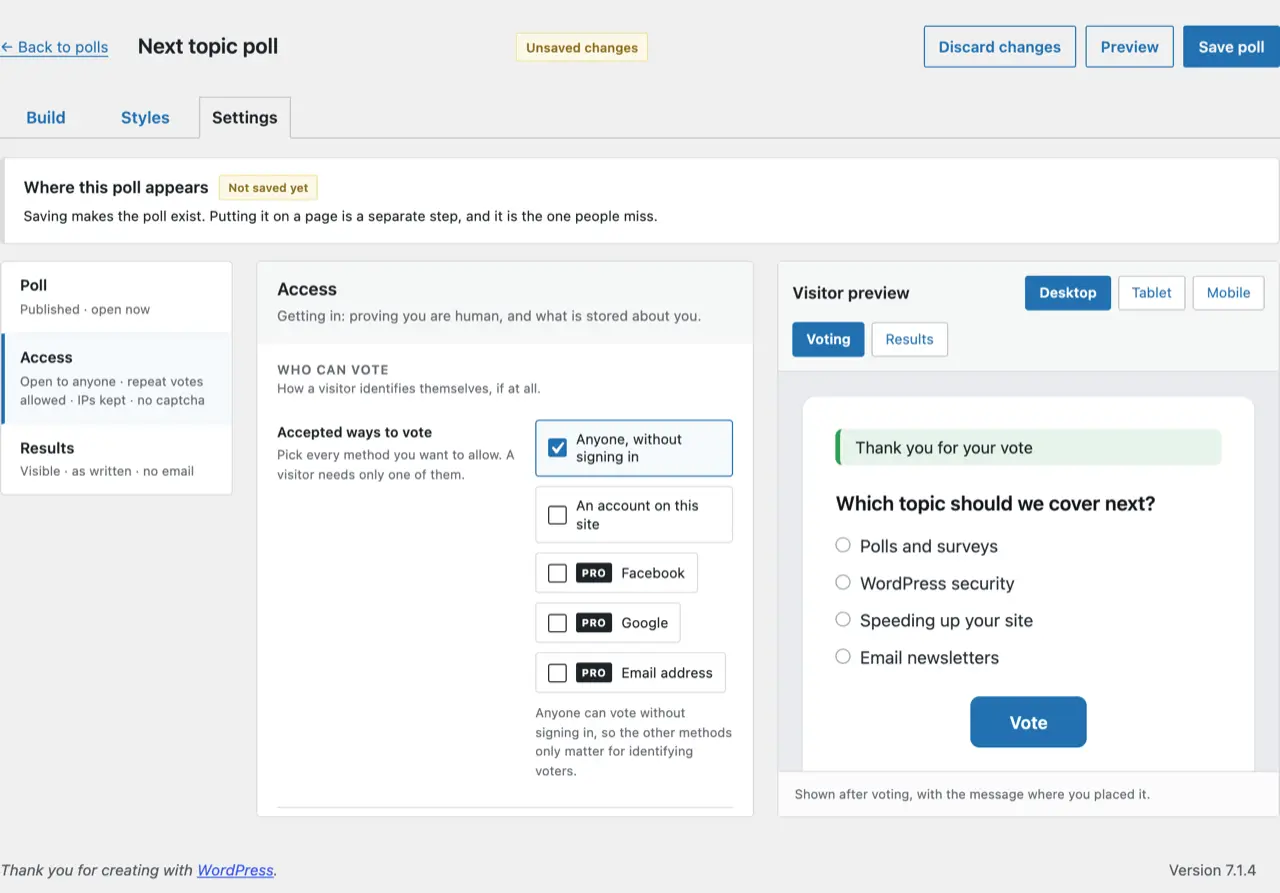
- Who can vote: Anyone, without signing in is ticked by default. To let only signed-in users vote, tick An account on this site and untick Anyone, without signing in. Facebook, Google and email address voting are part of YOP Poll Pro.
- Repeat voting: by default one person can vote again and again. Tick Recognize returning voters if each person should vote once. It recognizes voters by a cookie in their browser unless you choose another way under Recognize them by: Their IP address or Their account on this site.
- Spam protection: No check is the default. Built-in check has the visitor’s browser quietly complete a small task before the vote counts. A third-party service uses reCAPTCHA, hCaptcha or Cloudflare Turnstile, and needs that service’s keys.
- Privacy · GDPR and CCPA: by default the poll keeps voters’ IP addresses and asks for nothing. You can ask each visitor to agree before voting, anonymize IP addresses, or store none.
A cookie is easy to clear, so no setting stops every determined person from voting twice. For a contest or anything with a prize, let only signed-in users vote and, under Recognize them by, tick Their account on this site.
Step 6: Choose when visitors see the results
Open Results.
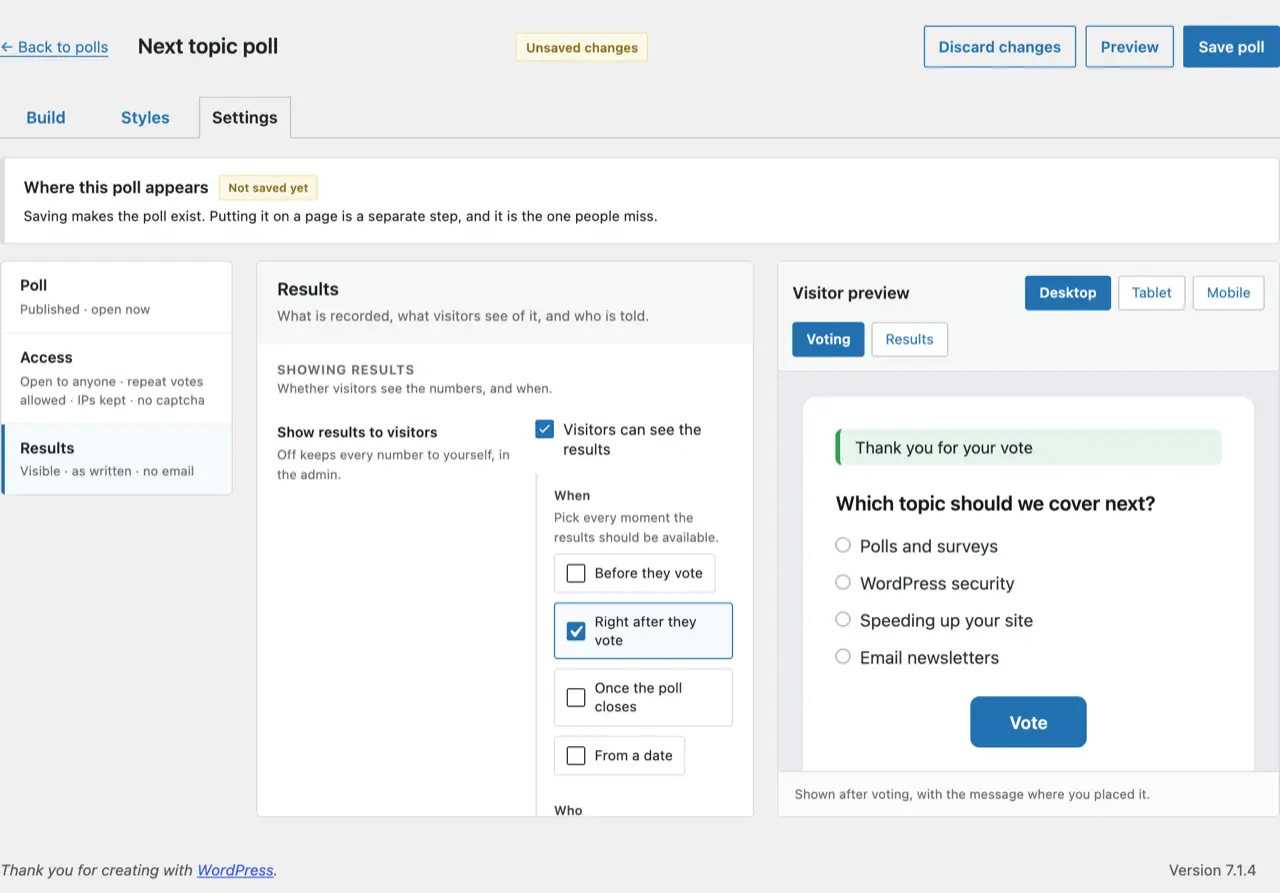
Visitors can see the results is ticked by default, and the results show Right after they vote. Under it you can choose:
- When: Before they vote, Right after they vote, Once the poll closes or From a date. You can tick more than one.
- Who: Anyone (the default) or Signed-in users only.
- Each answer shown as: Vote counts (the default), Percentages, or both.
To keep the results to yourself, untick Visitors can see the results. You’ll still see every vote in the dashboard.
Further down, Sort results puts the answers in the results As written, A → Z, Z → A, Fewest votes first or Most votes first. Reset stats automatically clears the votes on a schedule you set, for example every month.
Here are the defaults from Steps 4 to 6 in one place:
| Setting | Default | Change it when |
|---|---|---|
| Status | Published | You want to prepare the poll before showing it |
| Closes | Never | The poll is for a set period |
| Who can vote | Anyone, without signing in | Only members should vote |
| Recognize returning voters | Off | Each person should vote once |
| Spam protection | No check | Bots or bulk votes are a risk |
| Privacy | Keep IP addresses, ask nothing | You need consent or don’t want IP addresses stored |
| Results shown | Right after they vote, to anyone | Results should stay hidden until the poll closes |
| Results as | Vote counts | You’d rather show percentages |
Step 7: Save the poll and put it on a post or page
Click Save poll. The first time you save a poll, a window titled Put it where you want it opens. It says the poll is saved but not on your site yet, and offers Copy the poll block. If your site doesn’t use the block editor, Copy the shortcode is lower down in the same window.
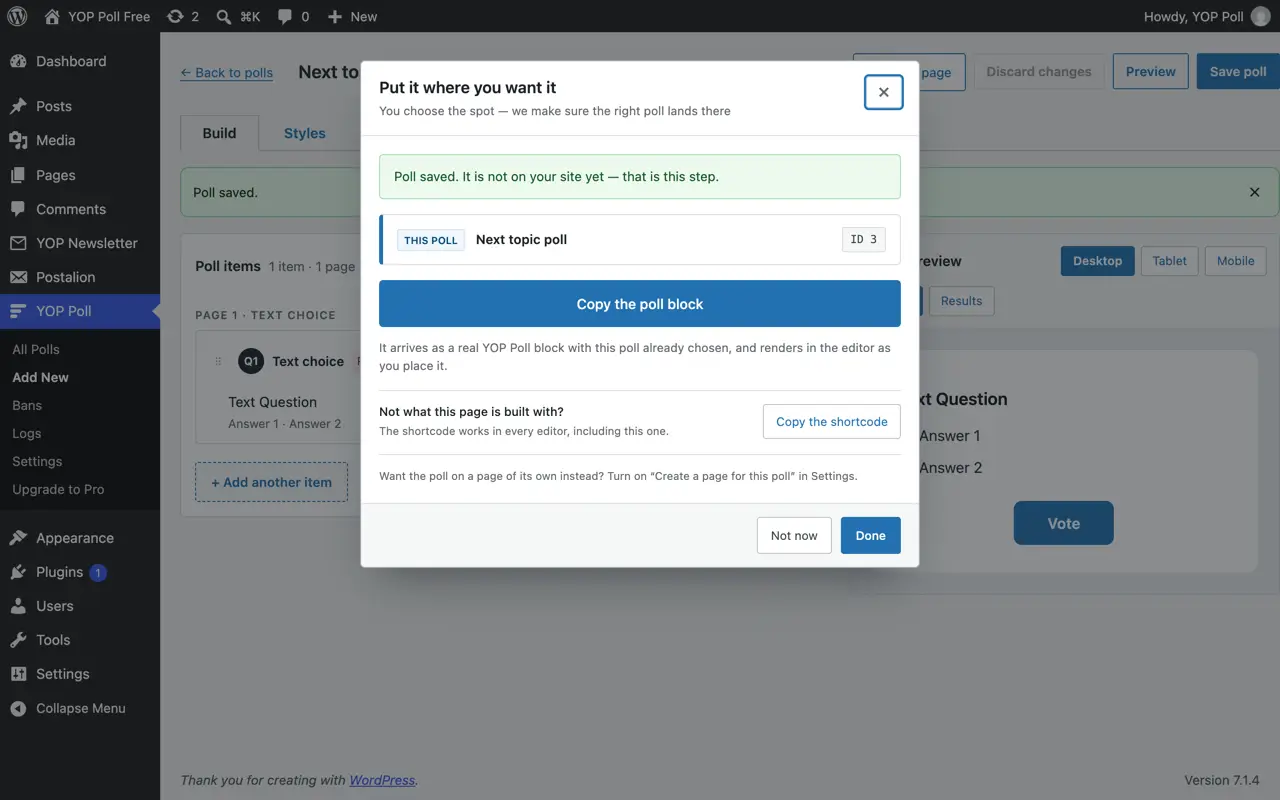
You can paste the copied block into a post or page, or add the block yourself:
- Open the post or page where the poll should go, or create a new one.
- Click where the poll should appear, type /yop and choose YOP Poll.
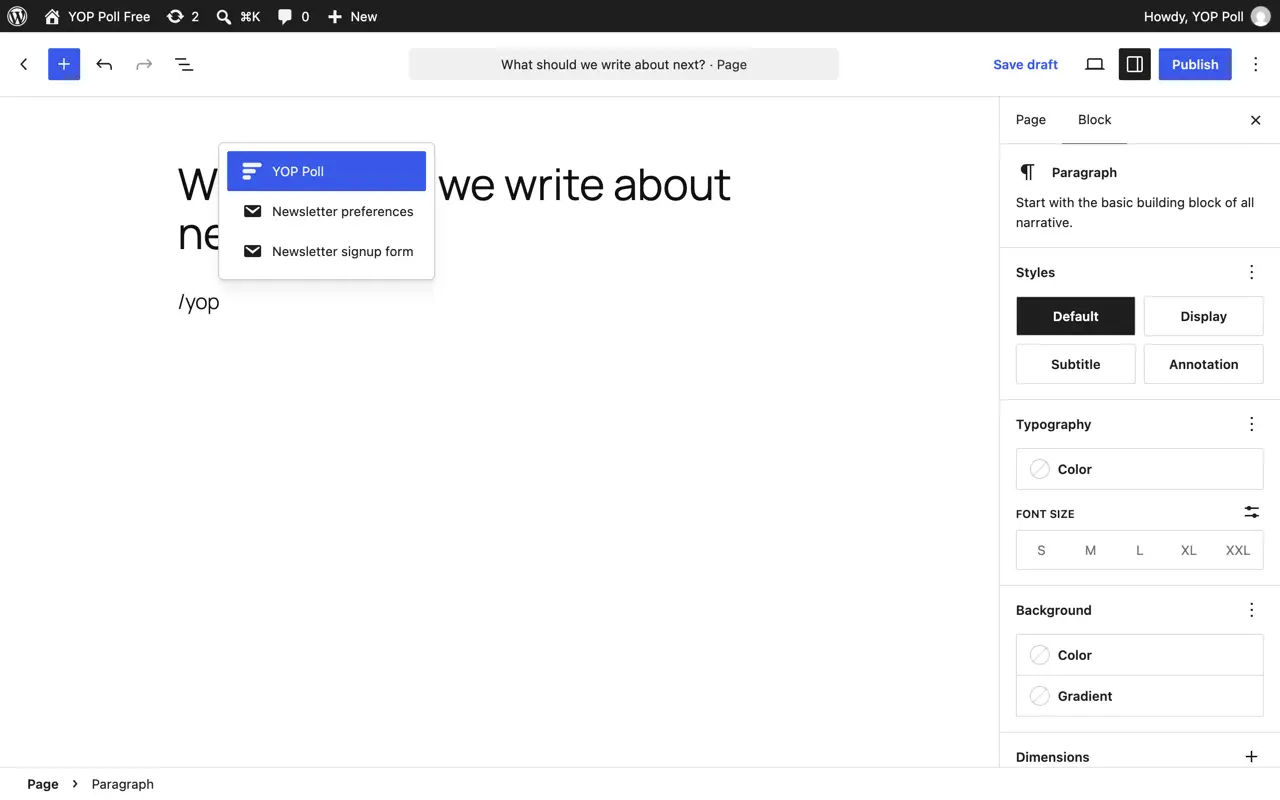
- In the Select Poll box, type part of the poll’s name and pick it from the list. We typed Next and chose Next topic poll.
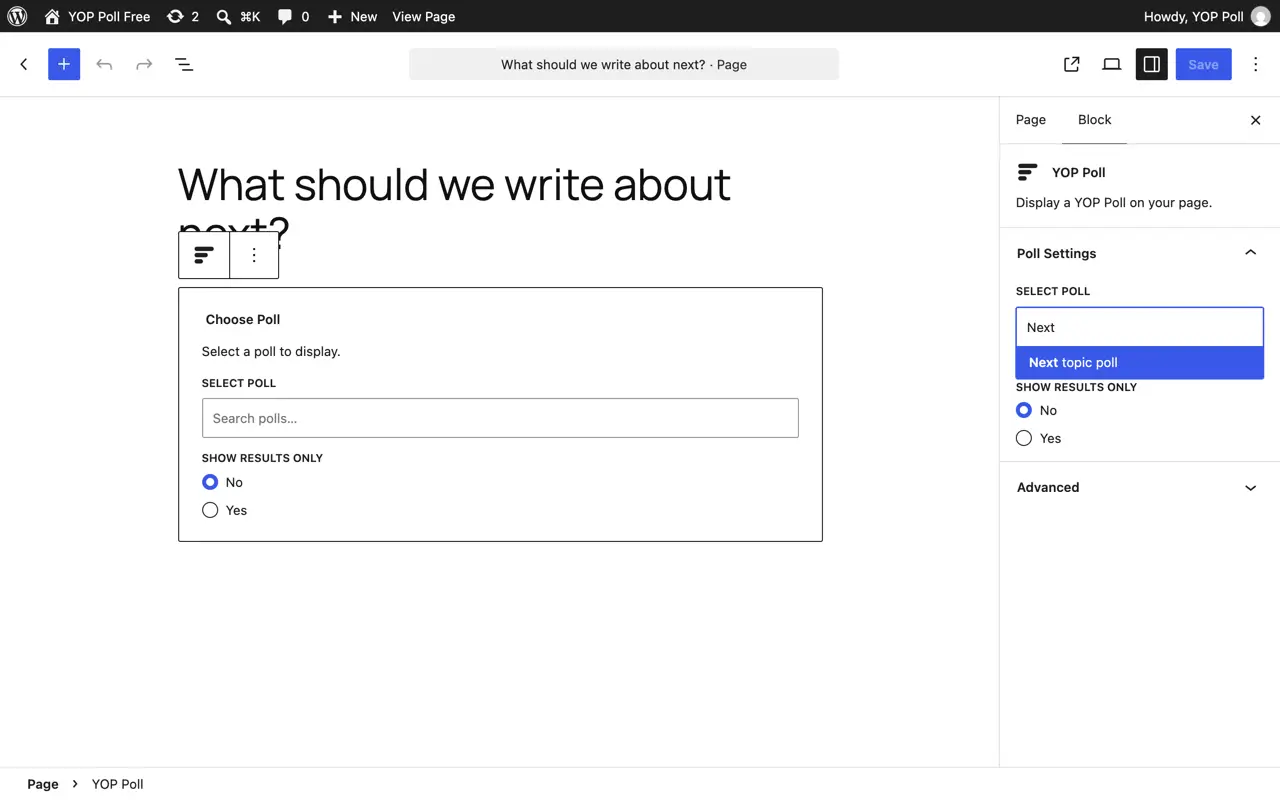
- The poll appears in the editor as visitors will see it. Leave Show Results Only at No so visitors can vote.
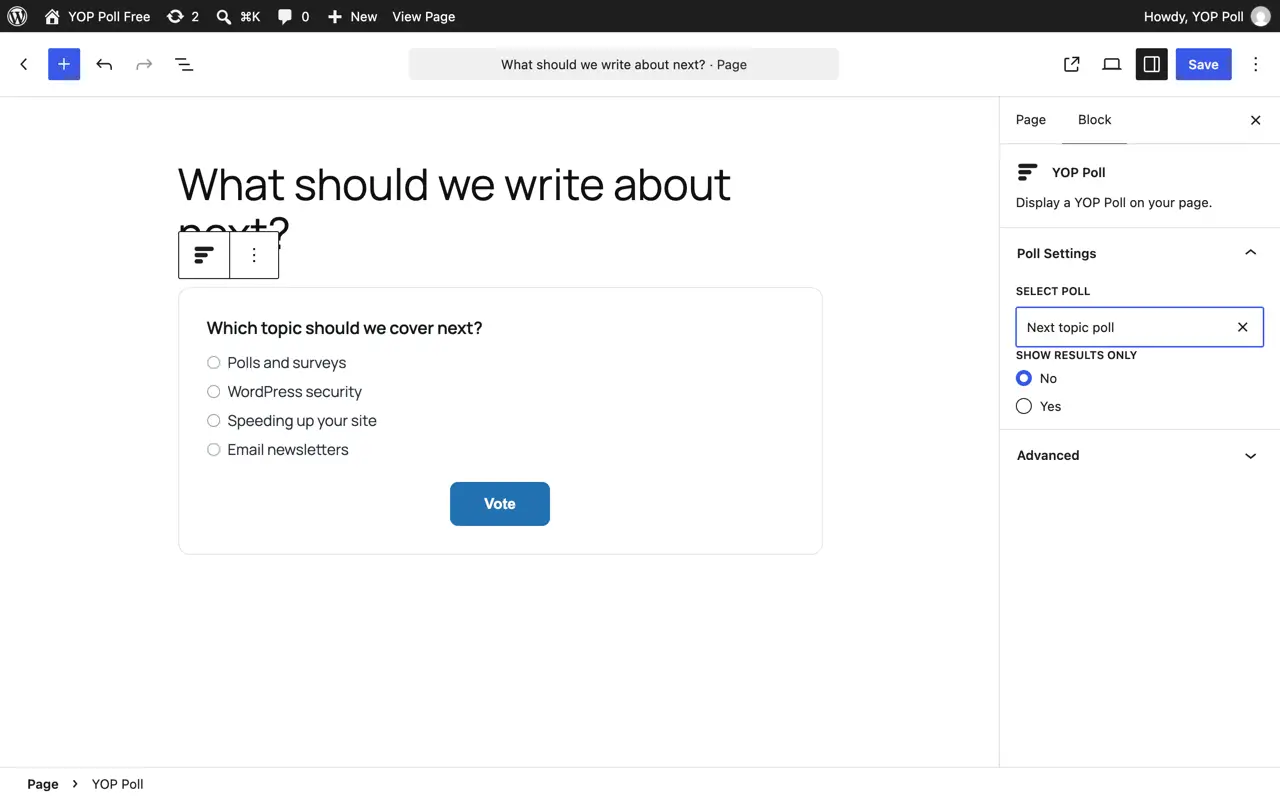
- Click Publish, or Save on a post or page that’s already live.
For more on adding blocks, see WordPress.org’s guide to adding a new block (opens in a new tab). If your page builder doesn’t use blocks, use Copy the shortcode and paste it into a text element or a Shortcode block (opens in a new tab). The shortcode uses the poll’s ID, which the window shows next to the poll’s name. For the poll in the screenshot above, with ID 3, it’s [yop_poll id="3"].
Two other places for a poll:
- A page of its own: in the poll’s Settings → Poll → On the page, tick Generate a page automatically.
- A sidebar or footer: in a block theme such as Twenty Twenty-Five, open Appearance → Editor and add the YOP Poll block to the footer or sidebar template part. In a classic theme, go to Appearance → Widgets and add the YOP Poll widget.
Step 8: Vote once and check the results
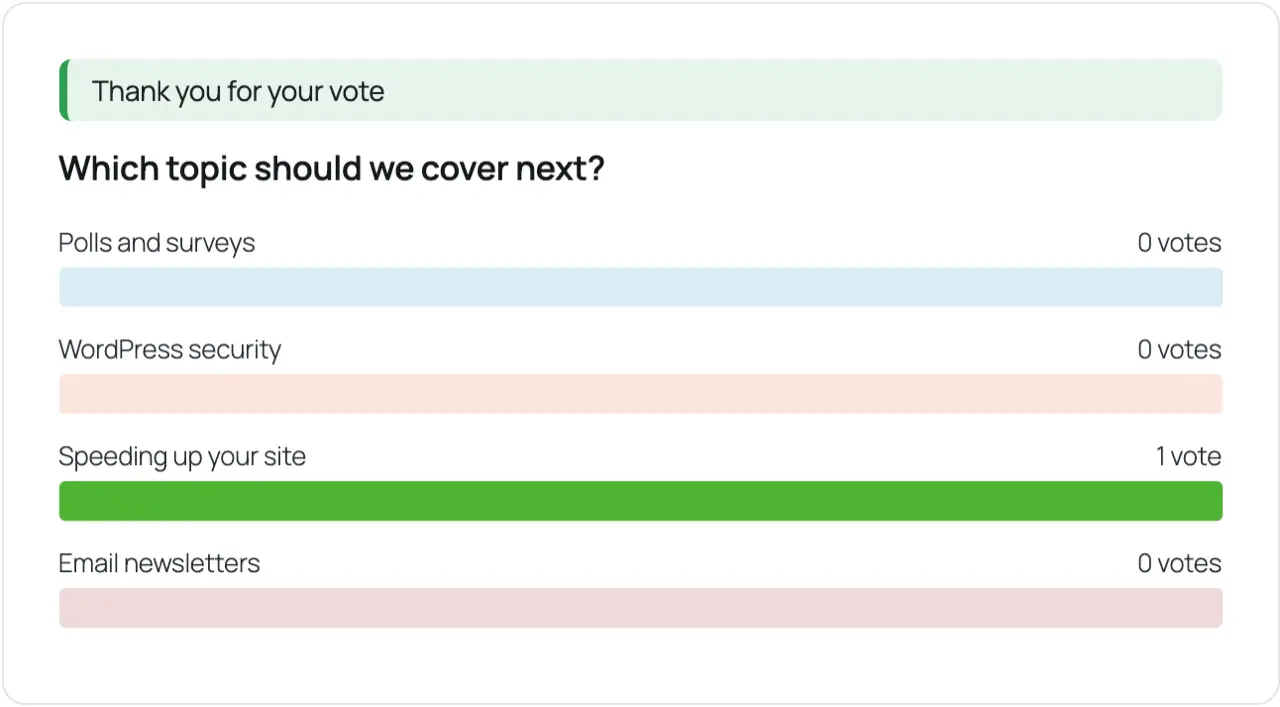
Open the published post or page, pick an answer and click Vote. With the default settings you’ll see Thank you for your vote and the results straight away.
In the dashboard, go to YOP Poll → All Polls, hover over the poll’s name and click Results. You’ll see the totals for each answer, and the Individual votes tab lists every vote.
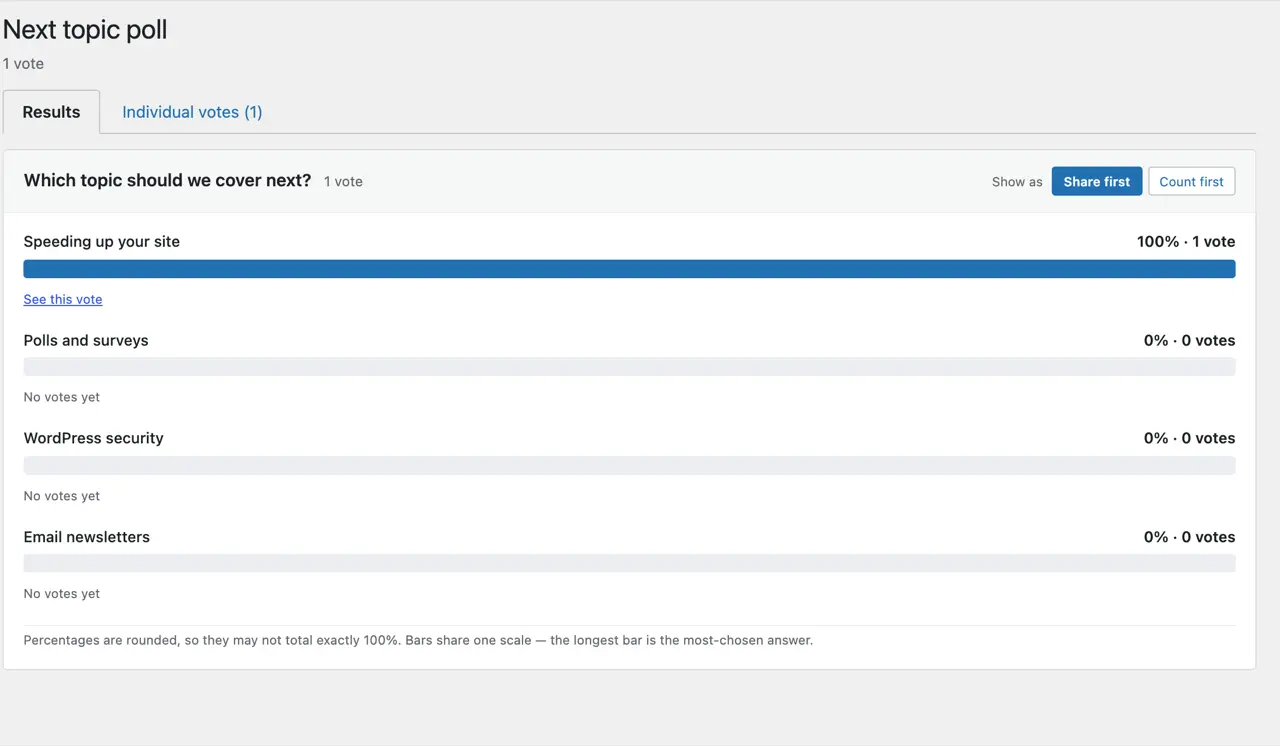
Your test vote counts like any other. To start clean before you share the poll, hover over the poll’s name in All Polls and click Reset votes. This deletes every vote on the poll and can’t be undone, so do it before real votes come in.
Common mistakes to avoid
- Saving but never placing the poll. A saved poll isn’t on any post or page until you add the block or shortcode (Step 7).
- Leaving repeat voting on. If one vote per person matters, tick Recognize returning voters (Step 5).
- Ticking “An account on this site” without unticking “Anyone”. Both are allowed then, so guests can still vote (Step 5).
- Publishing a poll set to Draft. A draft poll stays hidden wherever it’s placed, so check Status (Step 4).
- Poll not showing? Check that the post or page is published, that the block has a poll chosen in Select Poll, and that the poll’s Status is Published.
- Reading too much into a small poll. A poll shows what the people who chose to vote think, not everyone. Ten votes can point the way, but they aren’t proof.
Frequently asked questions
Is YOP Poll free?
Yes. The YOP Poll plugin on WordPress.org is free, and every step in this guide uses only the free version. YOP Poll Pro is a paid add-on that adds image, video and audio answers, rating questions and sliders, follow-up questions and more voting controls such as email-confirmed votes.
Can visitors choose more than one answer?
Yes. Click Edit on the question and, under Options, tick Visitors can choose more than one answer. Use At most to set a limit.
Can I show the same poll on more than one post or page?
Yes. Add the YOP Poll block or shortcode to each post or page and choose the same poll. Each copy is the same poll, so it has one set of results.
How do I stop people voting twice?
In Settings → Access, tick Recognize returning voters. It uses a browser cookie by default. For a stricter limit, let only signed-in users vote and recognize them by Their account on this site.
Can I hide the results from visitors?
Yes. In Settings → Results, untick Visitors can see the results, or show them only Once the poll closes. You can always see the results in the dashboard.
Next steps
Install YOP Poll from the WordPress.org plugin directory (opens in a new tab), ask one question your readers can answer in a few seconds, and check the results after a week.
If you want image answers, rating questions or follow-up questions based on the first answer, see what YOP Poll Pro adds.
Written by YOP Team, the author of the plugin.
Questions or corrections: ask in the YOP Poll support forum (opens in a new tab) on WordPress.org, or contact us. How we handle personal data is in our privacy policy.